
The most dangerous part of a hardware wallet is not the tiny device. It is the first quiet hour with the box open, the recovery card on the table, and your brain trying to treat the whole thing like normal app setup.
It is not normal app setup.
A hardware wallet setup creates or protects the information that may control your Bitcoin. A clean-looking screen can hide a very serious question: are you creating a wallet you can recover, or are you creating a future emergency for yourself?
This checklist is for beginners who already have, or plan to buy, a bitcoin hardware wallet and want to avoid the first mistakes: unsafe buying sources, prewritten seed phrases, digital backups, wrong receive addresses, skipping the test transfer, and never practicing recovery.

Setup is the moment to slow down, write the backup offline, and check before moving funds.
If you still need the basic definition first, read what a hardware wallet is. This page assumes you understand the broad idea and are now preparing for the practical setup.
Before You Start: What This Checklist Is For
Hardware wallet security is not one big dramatic action. It is a chain of small boring actions that need to happen in the right order.
The device matters. The setup environment matters. The seed phrase or recovery phrase matters more than most beginners expect. The receive address matters because Bitcoin transactions can be irreversible. The restore drill matters because a backup that has never been tested is still a guess wearing a neat little jacket.
Use this article as a beginner checklist, not as device-specific instructions. Hardware wallet makers can change packaging, firmware, companion apps, recovery wording, and setup screens. Before acting, check the device maker's current official setup guide for the exact model you are using.
Here is the map of the first setup:
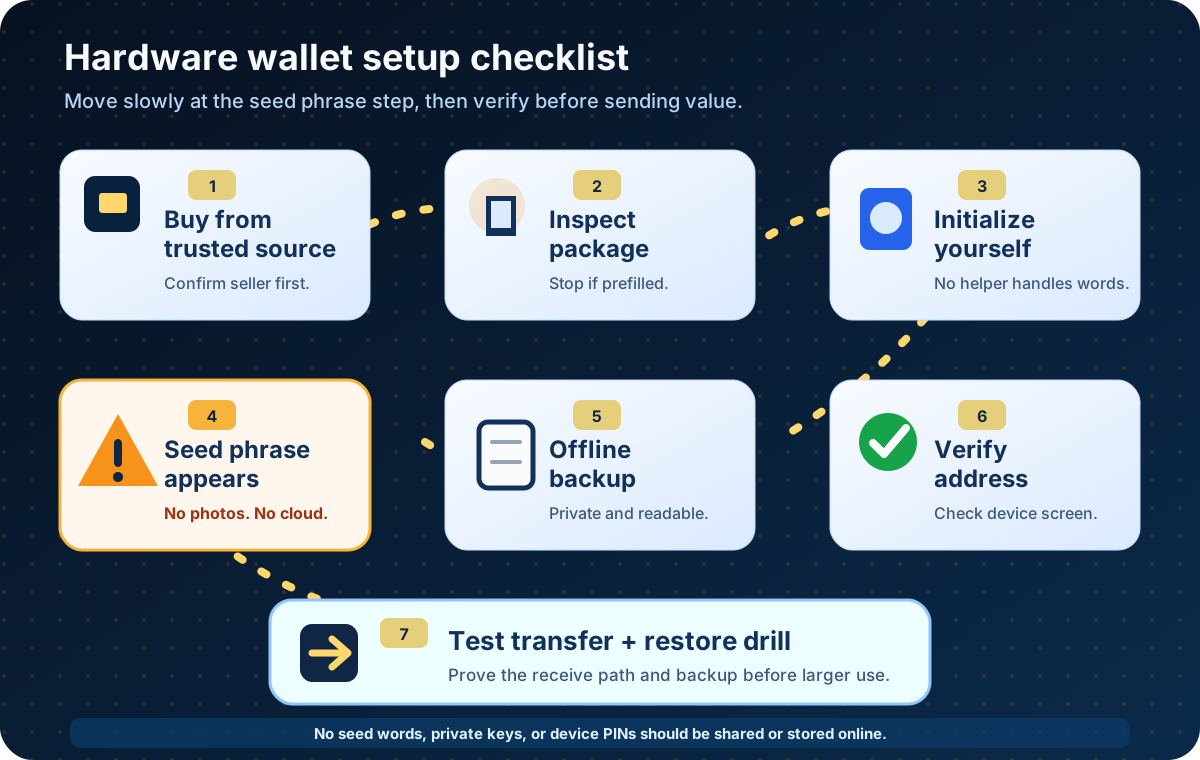
The seed phrase moment is the main pause point in a beginner hardware wallet setup.
The visual above is a map, not a replacement for the steps below. The real rule is simple: do not move meaningful funds until the device is initialized by you, the backup is offline, the receive address is checked on the device, and recovery has been considered.
Step 1: Buy From a Trusted Source
Start before the box exists.
For a beginner, a trusted source usually means the hardware wallet maker's official store or a current authorized seller listed by the maker. Do not rely on a random marketplace listing, a discount link in a comment, a direct message, or a device that arrives with someone else's instructions.
This is not about paranoia. It is about reducing easy supply-chain and phishing mistakes before you are asked to protect a recovery phrase.
Before buying, check:
The exact official website for the device maker.
Whether the seller is listed as authorized, if the maker publishes such a list.
Whether the device is new, unopened, and not described as preconfigured.
Whether the price, shipping route, and return path make sense.
Whether you are being pushed by urgency, giveaway language, or a support message.
Do not choose a hardware wallet because one article, influencer, or forum post calls it the only right answer. Different devices have different tradeoffs, interfaces, supported features, and recovery designs. Your job at this stage is not to find a magic object. Your job is to avoid starting from a bad source.
Step 2: Inspect the Package Without Paranoia
When the device arrives, inspect the package calmly.
Look for obvious signs that something is wrong: damaged packaging, mismatched branding, missing contents, signs the device was used before, or a recovery phrase already printed or written down. Packaging details vary by maker and model, so do not treat a random unboxing video as permanent truth.
The strongest beginner rule is this:
If the device arrives with a prewritten seed phrase, prefilled recovery card, or instructions telling you to use words that were already provided, stop.
Do not transfer Bitcoin to that wallet. Do not try to "fix" the words. Do not ask a stranger in a chat to check them. Go to the maker's current official support guidance and decide what to do from there.
Hardware wallet setup should create the recovery information under your control. It should not hand you a secret someone else may have already seen.
Step 3: Initialize the Device Yourself
Initialize the device yourself, using the official setup path for that exact device.
This does not mean you can never ask for help understanding terms. It means no one else should create the wallet, write the seed phrase, choose the backup, enter the PIN, or handle the recovery words for you.
A helper who means well can still create a serious security problem. A helper who does not mean well is worse.
Before you begin:
Use a private space where no one can see the recovery words.
Close recording tools, screen sharing, and cameras.
Use the current official companion app or official web setup path, not an ad link.
Confirm you are setting up a new wallet only if that is your intention.
Keep your phone camera away from the recovery card.
If the app, website, email, or support account asks you to type your seed phrase into a normal browser form, stop and verify with official documentation. A seed phrase should not be treated like an account password.
Step 4: When the Seed Phrase Appears, Slow Down
This is the cliff edge.
During many hardware wallet setup flows, the device will show a seed phrase, recovery phrase, wallet backup, or similar recovery words. Those words may be able to restore the wallet. If someone else gets them, they may be able to restore the wallet too. If you lose them and the device is later lost or damaged, access may be permanently lost.
That is why this moment deserves a physical pause.
Do not photograph the words. Do not put them in a notes app. Do not paste them into a password manager without deeply understanding the risks. Do not email them to yourself. Do not store them in a cloud drive. Do not send them to support. Do not ask an AI tool to check them.
The normal internet brain wants to make a backup by copying data into more places.
For a seed phrase, that instinct can be the problem.
Step 5: Record the Seed Phrase Offline
Write the recovery words offline, in the order shown, on paper or another physical backup method you understand. Check spelling carefully. Check word order carefully. If the device or official setup guide asks you to verify the phrase, take that verification seriously.
For a cold wallet backup, the goal is not just "hidden." It must also be readable, private, durable, and recoverable by the right person under the right circumstances.
Bad backup plans usually fail in ordinary ways:
The handwriting is unclear.
The order is ambiguous.
The backup is stored in a photo library.
The paper is damaged by water, fire, fading, or cleaning.
The hiding place is so clever that future-you cannot find it.
The backup is found by someone who should never see it.
If seed phrase storage is still fuzzy, pause here and read Seed Phrase Storage for Beginners before moving funds.
Step 6: Verify the Receive Address on the Device
A hardware wallet usually works with a companion app on your computer or phone. The app may show a Bitcoin receive address. When the device supports it, verify the receive address on the hardware wallet screen itself before using it.
This check matters because the connected computer or phone is still part of the workflow. Malware, clipboard tricks, browser confusion, fake apps, or simple user error can point you toward the wrong destination.
For a beginner, the practical check is:
Open the receive screen for Bitcoin or BTC.
Confirm you are looking at a Bitcoin receive address, not another asset or payment path.
Compare the address shown in the app with the address shown on the hardware device.
Use the address only after the device confirms it.
If anything does not match, stop and investigate through official guidance.
If QR codes are involved, remember that a QR code is only a container. A public receive address QR can be shared carefully. A private key QR or seed phrase QR should not be shared or scanned into random tools. For that difference, use the guide to private key QR code safety.
Step 7: Send a Small Test Transfer First
Before moving an amount you would be upset to lose, send a small test transfer.
A test transfer is not a guarantee. It does not prove every future transaction will be easy. It does not remove price volatility, network fees, platform review, withdrawal limits, or user error.
It does answer a smaller and useful question: can you receive Bitcoin at the address you just checked, through the wallet and platform path you are using today?
For the test:
Use the current receive address you verified on the hardware device.
Check the sending platform's current withdrawal fee, minimum, limit, network choice, and review requirements.
Send a small learning amount first.
Wait for the wallet and platform to show the transaction status.
Save non-secret records such as the date, platform, amount, transaction ID, and purpose of the test.
Do not record your seed phrase in the same note. The record is about the process, not the secret.
Step 8: Do a Restore Drill Before You Rely on It
Writing down a seed phrase is not the same as knowing you can recover the wallet.
A restore drill is a practice recovery check. It can reveal a missing word, wrong order, unreadable handwriting, forgotten passphrase, or misunderstanding about the wallet's recovery flow.
The lower-stress time to do this is before the wallet holds meaningful funds. Some devices offer an official recovery-check or dry-run feature. Some setups may require a spare device, a fresh wallet, or another controlled method. Details vary, so do not improvise from a random comment.
Use the wallet maker's current official guidance, and read SatoABC's Bitcoin wallet restore drill guide before deciding how to practice.
If the wallet already holds funds that matter to you, do not wipe or reset the main device just because a checklist mentioned recovery practice. Slow down, read the official documentation, and choose a lower-risk path.
Step 9: Keep the Setup Healthy Over Time
Hardware wallet security continues after the first setup.
The ongoing habit is not glamorous. It is a periodic check that your device, backup, software, and own memory still make sense.
Review these items occasionally:
The seed phrase backup is still readable and private.
The backup location still fits your household, fire, water, theft, and access risks.
You know which official device guide to use for updates and recovery.
Companion software and firmware update messages come from official sources.
You are not clicking update links from ads, direct messages, emails, or fake support accounts.
Any optional passphrase, if used, is included in your recovery plan without being stored carelessly beside the seed phrase.
Your non-secret recovery notes are still useful.
The device is not the whole system. The system is the device, the backup, the official instructions, the receive-address habit, and the future person who may need to recover under stress.
Give that future person a setup they can actually use.
Stop Signals During Setup
Some setup moments deserve an immediate pause. The point is not to be afraid of the device. The point is to notice when a normal-looking instruction crosses into seed phrase, address, or source risk.
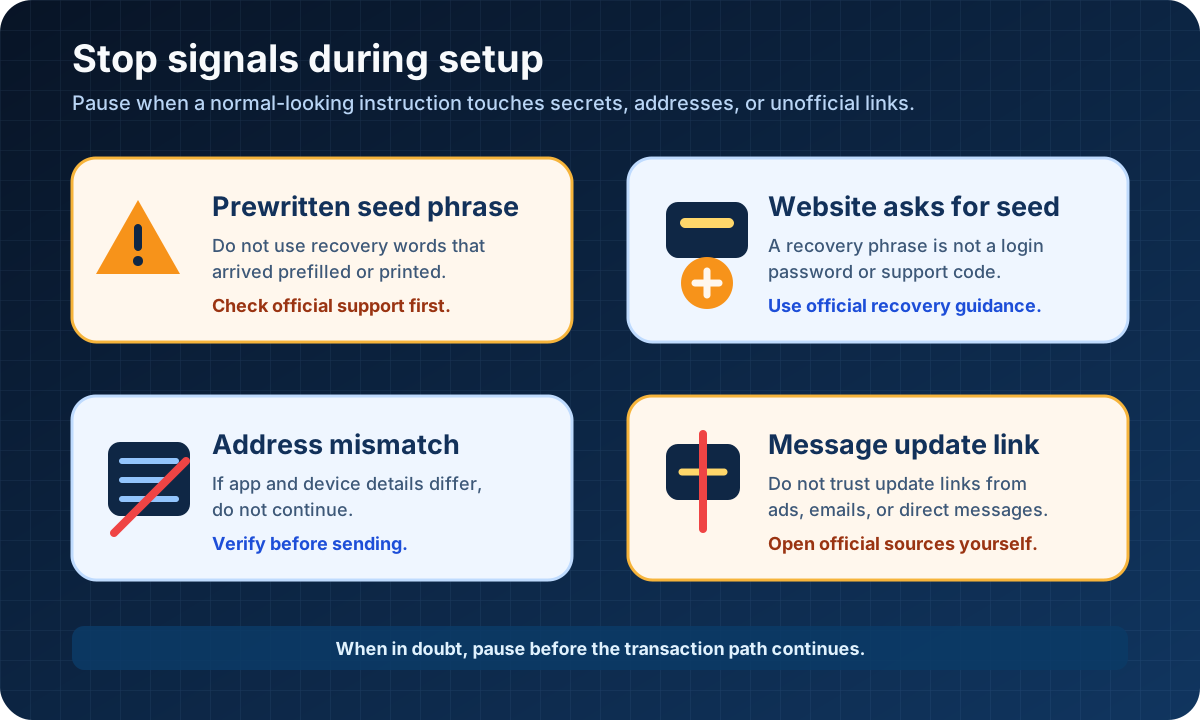
Pause when the setup path touches seed words, address mismatch, or unofficial update links.
If one of these stop signals appears, do not rush to rescue the setup. The rescue attempt can become the mistake. Step away from the transaction path, open the official documentation from a known address, and decide slowly.
FAQ
Should someone else set up my hardware wallet for me?
No one else should create the wallet, write the seed phrase, choose the backup, enter the PIN, or handle the recovery words for you. You can ask for help understanding concepts, but the actual wallet creation and recovery phrase handling should stay under your control.
Should I type my seed phrase into a website?
Do not type your seed phrase into a normal website, support chat, search result, giveaway page, browser pop-up, AI tool, or random recovery checker. Only use the official recovery or verification flow you have decided to trust for your exact wallet or device.
Do I need a test transaction?
A small test transaction is a useful beginner habit before moving an amount you would seriously miss. It helps you practice address verification, withdrawal steps, fees, status tracking, and confirmations. It does not guarantee every future transfer will work the same way.
What should I check after firmware updates?
Use only the maker's current official update guidance. After an update, check that the companion app is official, the device behaves as expected, your receive-address verification still works, and your recovery plan is still clear. Do not click update links from ads, emails, direct messages, or fake support accounts.
What if my device came with a seed phrase already written down?
Stop before using it. A seed phrase that arrived prewritten may have been seen by someone else. Do not transfer Bitcoin to that wallet. Check the device maker's current official support guidance and avoid troubleshooting through strangers, comments, or direct messages.
Is a hardware wallet enough for cold wallet backup?
No. The hardware wallet device is not the complete backup plan. A cold wallet backup usually depends on protecting the recovery phrase or other recovery method offline, keeping it readable, keeping it private, and knowing how to restore before an emergency.
Risk Disclaimer
This article is for beginner education only. It is not financial, investment, legal, tax, custody, or cybersecurity advice. Bitcoin transactions can be irreversible, Bitcoin is volatile, and wallet mistakes can cause permanent loss. Hardware wallet devices, firmware, companion apps, recovery features, supported assets, fees, limits, and official setup paths can change. Check the hardware wallet maker's current official documentation and the sending platform's current policy before acting. Never share your seed phrase, private keys, recovery phrase, wallet password, PIN, or login codes.
Editorial Attribution
Written by Alex Chen. Reviewed by Jordan Blake for factual accuracy, clarity, and beginner safety.